We started by buying extra large t-shirts from the dollar store. The store only had maroon even though I was hoping for black. Actually, the maroon color happened to be the same color found on the inside of the school cloak from the movie, so it was acceptable. The maroon shirts were over-sized for the kids and looked really great. No, the length didn't reach the floor, but the look was still effective and having all the kids wear the same thing really looked cool! I printed the Hogwarts seal onto sticker paper and used my wonderful X-acto knife to cut around the seal's outline and stuck it to the shirt with no issues. To make the shirt into a cloak, I simply took scissors and cut the front of the shirt in half, lengthwise, in the middle. That's it! Amazingly easy!!!
 In the movie, the students wrote with quills and we wanted to create that same identity with Harry Potter. We found tiny gel pens at a local Office Max store, the perfect size needed to fit into the feather. Regular pens have ink casings too long to fit properly into the end of a feather. I took the feather and cut a slit along the tip-end until it was no longer hollow. I unscrewed the tiny pen and took it apart to get the ink well casing. I then shoved the inkwell casing into the feather as far as it would go. The depth will vary and you'll always have some of the pen sticking out of the feather. To cover this up and help the ink well stay in place, I used electrical tape to wrap it securely in place. The feathers were several colors so I tried to match the tape to the feather's color. So the ink doesn't dry up, I capped the ends with the pen's body until the day of the party. Didn't these turn out fabulous?
The textbooks really acted as a road map to the party's itinerary. It led us through the various classes, students wrote in their books as they created their spells and potions, it helped as an answer book to trivia questions. The textbook was definitely a working prop!
To make (sorry, no step-by-step pics), I bought some "pleather" fabric from the local fabric store using a 40% off coupon so, super cheap! The cover had to be a bit larger than a regular sheet of paper which was used to print the pages of the textbook. I cut the cover, folded, and hot-glued all the edges, inward. For the corners, I cut a slit so the folding was more flat and not a bulging mess.
Your cut pleather doesn't have to be pretty because you're then going to hide the folds with your inside cover using old-looking scrapbook paper. This adds such a nice, old-world effect to the look of the book. BUT BEFORE gluing down the inside cover, cut a piece of ribbon and hot glue that onto the pleather book down the center. This will act as your student's bookmark (clever and classy, I know). Print out your book's pages and nest them into your inside cover's center and staple with a long-arm stapler, 3 times down the center of the main book. To attach to the pleather book cover, hot glue the inside cover scrapbook paper to the inside of the pleather book cover, covering all the folds, etc. I made the mistake and didn't staple the guts of the book until the end so the staples are showing through the pleather, so learn from my mistake, friends.
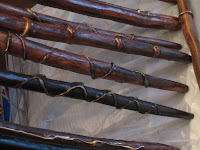
The wands themselves were pretty simple to make. The boxes? A whole 'nother story. First, the wands were made from tree branches my son and I found on a hike. It was great to see the tree branches on the ground and trying to envision a wand in its form. DO NOT cut the branches from the tree as the branch will be too green to take on stain, so the dryer, the better. Take your kitchen potato/carrot peeler and start peeling away the bark down to bare wood. Super Hubby and my dad took the bared branches and sanded them down smooth using a belt-sander. We didn't want any of our wizards to get splinters:-)
Once smooth, apply a wood-stain to each branch and allow to dry. Now for the fun part, take your glue gun and start decorating the wand in whatever pattern that inspires you. Make each one different. When the glue dries, take a gold paint pen and color the glue lines.
Next, take some black paint, water it down a lot, and brush on the wand and wipe down IMMEDIATELY. Work in sections or your effect will only be a black wand! You're only doing this to make it look really old. The results are amazing, each unique, each real wood!
The wand boxes were challenging, but doable once we decided what we wanted to do. First we tried wrapping the box with paper, but painting it was really the easiest method. You'll need cardboard. Look to the big warehouse stores' box area for a great selection. Super Hubby used this link to gather the measurements needed for the box: http://www.youtube.com/watch?v=qYfiIW5HY8Y. Once the boxes were done, we needed to outfit the inside of the box. Again, I apologize for lack of pictures but when you're trying to pull off a party of this magnitude, there's just no time for step by step.
Super Hubby bought a panel of pink foam house insulation and was able to cut into it to create a shaped well to hold each individual wand perfectly snug. We double layered the thin insulation to meet the height of the box. He took each wand and individually outlined the wand's shape, cut out the first insulation layer using an X-acto knife, and glued the two layers together.

Afterward, we used velvet material to cover the double layer of pink insulation, leaving enough fabric to lay into the hole where the wand nests. So beautiful, Universal Studios has nothing over these boxes, I'm telling you!
Super Hubby then put his graphic design talents to work and made all the labels, inside and out, for the boxes. The end of each box had a special serial number so Super Hubby knew which wand was whose during the Ollivander's shoppe scenario. The wand needed to choose the right wizard after a few trials. Smart!
Other props included an old trunk where we placed the Quidditch balls. It was also important to glam-up a plastic trophy as the Hogwarts House Cup by simply adding a sticker to the base. And we certainly can't forget Dudley, as the students threw magnetic darts at the target. All our equipment for our Potions and Elixirs class was borrowed from a real lab, real equipment (thank you, friend; you know who you are).
Finally, this Sorting Hat was purchased from Amazon and was so worth it! Here's why. The hat has a hidden compartment where we put my cell phone, set it to speaker, and the hat "talked" to the kids during the Sorting Ceremony (Super Hubby downstairs on the house phone, on the line with my cell phone - brilliant!). I did starch the hat to create a stiffer "face-look". Sometimes, store-bought is worth the convenience when you're doing a lot of other things yourself.
Catch LOVD's W.I.M. Wednesday next week when we talk about the food!
Need to catch-up to this post?
Series 1: The Invitations
Series 2: Setting the Scene










15 comments:
Hi! Visiting from Live Laugh Rowe. Oh my this is too cute! I love all the details! The sorting hat is the best :)
Wow, you did an amazing job. I love that the wands are made of real wood and totally DIY. Adorable. Love the little books as well, and that they were a prop to use the entire party...and a fun take-home gift too, I'd imagine.
that sorting hat is adorable. Love the secret cell phone part. I have never heard of that!
Lauren from www.shootingstarsmag.blogspot.com
I did a Harry Potter Bar Mitzvah for my nephew many years ago and it was hard, I wish I would have had this post then!! Thanks for sharing and I am a new follower! I hope you have a great weekend coming up!!
Michelle
www.delicateconstruction.com
Love it. I haven't read or seen any Harry Potter yet but my boy will be getting there soon. He just turned 6. Thanks so much for sharing at Toot Your Horn Tuesday!
What cute ideas!
OMGosh!!!!! LOVE LOVE LOVE your ideas!! I am a total HP freak! I had to Pin this!
Thank you so much for sharing!!!
Wonderful party theme and some terrific things to create the theme perfectly. Hugs and wishes for a beautiful week ahead.
How did you make the cups!? I love them
Hi!
I love your "textbooks"! Do you happen to have the file still to share all of your pages? I am teaching a Harry Potter themed summer school class and would like to see your workbook to get a few ideas to use for mine!
Thanks!
Hi, Lindsay,
I should still have the files (we keep everything). Just provide me with your e-mail address, and I'll send you the file. OK?
My email is lindsaybagniewski@getschools.k12.wi.us
I am so excited! Thank you so very much!! :)
Lindsay
Thank you so much for sharing! I would also love the "textbooks" files if possible. Thank you! pschrist@gmail.com
I am sorry, my correct email is : pschrist3@gmail.com
I'll bet you never expected to still be receiving requests 5 years later on this wonderful post! PRetty please, I'd love the textbook files too! My daughter is a HP superfan with a birthday party around the corner. :) sdgeekmom@gmail.com
I know this is several years old, but I am very interested in this party as I am planning a Harry Potter party for my son. If you still have the files for the textbooks I would be so thrilled to see them. My email address is sonjalbrandt@gmail.com I know this is a long shot as how long it has been since you had this party. Thank you so much for sharing your ideas here. They have been very helpful thus far.
Post a Comment