Last week, I shared with you the the all-important making of the invitations. Click here if you missed it. This week, I'll share with you the party props we made and/or used to carry the theme through.
Oh, yes! The theme! It probably needs some explanation. Kiddo L.O.V.E.S. Lord of the Rings. Tolkien is his fave author and he is so into that kind of fantasy-type world. Additionally, if you have a tween boy in the house, you are also probably VERY familiar with an online game called MineCraft. With me so far? What if you combined MineCraft with Lord of the Rings by creating a virtual world? A virtual adventure within MineCraft, where all the party guests work together, not against each other, but as a Fellowship to complete the mission at hand? I know what you're thinking? Yes, it would be superb, but is it possible? Not only is it possible, my friends, it's what we did for this party!!!! (You can send the Parent of the Year Award to our P.O. Box).
I'll explain all the details of the party in next week's post, but I'll show you all the decor we used to set the mood in this post. We decided to combine the two themes into one so, some items will be Tolkien-based, and some items will be MineCraft-themed. It works, trust me!
The Decor
 We used our finished basement to set-up all the computers and equipment we needed to make this adventure come alive. To better set the mood, we replaced all of our spotlight bulbs with black lights. The effect was quite amazing and very awesome!
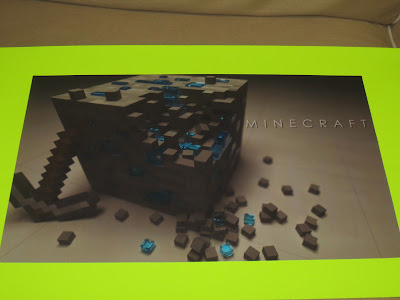
Super Hubby found a great number of MineCraft-themed posters online via Google images and had them printed on a large-format printer. Although the posters were adequate on their own, I mounted them to neon poster cardstock paper to help them really shine! They came out perfectly.
Super Hubby took the main characters of MineCraft and made life-size cutouts of Steve, a Creeper, and a Skeleton (sorry for the lingo non-Minecraft readers). This was a bit of a challenge to put together because the life-size figures measured over 3-feet. How do you print-out something that big? You print sections of it and piece it all together by taping the backside. (I was geometrically challenged on this task but I pulled through.) If you are interested in re-creating this party and want files of these "sectioned" print-outs to do on your own, please contact me and I will send to you.
The Cake
 |
| The pixels read "Happy B-Day Jack", The coconut is only in the middle! |
Next, I created butter cream frosting and dyed it the same color green as the grass in MineCraft. To get the texture right, take 4 ounces of coconut, place in a plastic bag, and sprinkle a few drops of green food coloring into the coconut. Shake the bag until all the coconut is green. (Powdered food coloring works best, if you can find it. If not, the liquid will be fine. Just let it dry before sprinkling on the cake.) Set the bag aside.

 To frost the cake, take another 4 ounces of coconut and add it into the butter cream frosting before spreading it onto the cake. (This is optional as many kids do not like coconut frosting.) To please all, I frosted both ends of the cake without coconut, and only the middle with coconut. YOU WILL NOT FROST THE SIDES. Remember, you are trying to create a MineCraft block of dirt and grass! Sprinkle the top of the cake with the green colored coconut to give it the texture found in the MineCraft game. When you cut the cake, cut in perfect squares so each guest has a "block" of their own.
Finally, I bought Starburst fruit candies and took all the red cherry ones out. I unwrapped each, cut many into fourths for tiny squares, or pixels, and spelled out "Happy B-Day". For my son's name, I used the whole Starburst square because I wanted it to stand out.
Let me guess what you're thinking. Where the heck is the Tolkien part of the party? Sounds to me like it's only MineCraft! Hold your horses, because the entire adventure is ALL Tolkien inspired, from an elves point-of-view. I'll talk more about this next week.
The Sign
Upon arriving at the party, I did make this famous Hobbit sign found at the front gate of Bilbo Baggins's home. I love how this sign turned out. Definitely a keeper. Here's how I made it.
What You'll Need
Thin, but long piece of wood, already stained to your liking
Black paint marker
Awl or very large, sturdy pin
Print-out of the words, enlarged to fit your wood piece (found on Google Images)
Ribbon for hanging the sign
What You'll Do
Super Hubby found this perfect piece of wood that was already stained and already had holes for the hanging ribbon already in place. What luck?!?! Unfortunately, it was one of those types of woods that was varnished to death. If I traced over the printout onto the wood, I couldn't make any impression into the wood no matter how hard I pressed down. I had to come up with a new plan for this to work (since I'm no artist).
To remedy this inconvenience, I taped my paper across the piece of wood and took a very sharp but strong pin. I followed the outline of the letter by poking through the paper and into the wood. It left a small hole that allowed me to just connect the dots once I removed the paper. That's how I was able to transfer the lettering onto the wood! Then it was easy. I just took my black paint pen and filled in the outline. A black Sharpie permanent marker works just as well.
What You'll Need to Know to Finish
Our piece of wood already had the holes in the corners for hanging. If yours doesn't, take a small drill bit and make your holes. Then, take a ribbon, pull it through the holes, and you're ready to hang your sign, just like Bilbo Baggins did. I wish we had a gate.
The Party Favors
 |
| One of Kiddo's birthday gifts: The Ring!!! |
Then, at the Dollar Tree, I found these glow-in-the-dark mini swords (see first pic). Those were just so perfect for our elvish adventurers. And, finally, the guests had some really cool candies to choose from like marshmallow ropes, RING Pops, Peach Gummy RINGS, and, of course, Swedish Fish (Gollum's favorite). Are you getting the "ring" theme?
Check back for the party details on next week's What I Made Wednesday!










No comments:
Post a Comment