Showing posts with label W.I.M.Wednesday. Show all posts

Wednesday, June 26, 2013

What I Made Wednesday {Lord of the Rings/Minecraft Birthday Party}

Ever since Kiddo was born, we've always had his birthday party at the house, put on by Super Hubby and me, and always themed to the max. When Kiddo got to be a little older, we took birthday-themed parties to a whole new level. Each party we created whisked the party guests to an imaginary world, depending on the theme. To get a glimpse of the lengths we go to create these imaginary worlds, just check out Kiddo's birthday party from last year, click here.

For every party we made it easy for the kids to really get into the theme. Kiddo has always been into imaginative play and he befriended many kids of the same nature, so you can imagine how cool it was to don a Jedi uniform and pretend you were mastering Jedi skills like at the Star Wars party. Or, how about donning a pirate's sash, eye patch, and bandana as they scavaged the yard looking for doubloons at the pirate party. There has been a spy party, Ninja party, I can go on and on. As wonderful as this was, we knew it would come to an end once Kiddo turned a certain age. That age was 11. Kiddo still likes imaginative play, but he was inviting kids that perhaps could not appreciate getting into the spirit of things and dressing up and pretending to be in another world just wasn't going to go over as a huge hit.
The various adventure locations on the map.

So, how do you have a Lord of the Rings birthday party, create a special world, and get 11-year olds to be willing participants? You create a virtual world where they adventure into a video game, all together as a Fellowship, and complete an adventure Minecraft-style!

Super Hubby has his own computer consulting firm so it didn't take that much effort to procure 8 computers, and all the other hardware we needed to make this work. To see how we prepped for the party, click posts here and here to get caught up. Now, on to the party itself!

The explanation of this party is beyond my comprehension so if you're really interested in replicating this party, please e-mail me directly and Super Hubby will give you all the technical details. Here's our To-Do list for the party from a technical level. Techies should get it.


Minecraft     
Bree
Dense Forest
Time Portal
Upgrade Beds, chests
Fix mountain pass – stairs out, bridges
Minas Tirith – scavenger hunt
Update syntax of notes
Texture pack
Setup laptops
Cables
Mice/keyboards


Server
spawn-animals – false
view-distance- 9(far)
PVP-false
Add my username to ops.txt to become operator
Test move command, etc


On a more understandable level, imagine 8 party guests, brought in to the party as Elves, following the calling indicated by the party invitation, see it here. Each has their own computer and mouse already awaiting their arrival. Each guest sits at the computer and designates their own avatar in the virtual world where adventure awaits. Thanks to a server, each guest is in the same world, at the same time. They see each other. They must work together, as a Fellowship, to complete the adventure. Contrary to Minecraft, this adventure requires no mining or crafting. It is purely an adventure.


At designated areas, there are notes dispersed to our adventurers to help them along their journey. Because I didn't want our guests to be glued to a monitor for the entire party, we had designated stops along the way during the adventure. For instance, when they left Hobbiton, they were to all meet at the Prancing Pony in Bree. There, the elves left their computers and came upstairs to partake in meaty snacks only a Hobbit could love: salami, cheese, crackers, olives, pickles, and ham. To quench their thirst, we served Butter Beer. (I know, it's a Harry Potter thing but it was such a big hit last year, we had to repeat it).


  I purchased iced coffee glasses at the Dollar Store and embellished the glasses with border stickers. Believe it or not, I've washed these glasses in the dishwasher and the stickers have stayed put!

Back to the adventure, and through the portal, our Elves returned to their posts and continued on. They stopped at a cave; another opportunity to take a break from the computer screens. We served them Lembas Bread at that point.


Before the big battle, they reached the Castle in Gondolin. Here, I used our dining room and made a royal spread consisting of very Lord of the Rings-inspired foods like potatoes, steak on a stick, chicken kabobs, more Lembas Bread, corn on the cob, and, of course, more Butter Beer. During the feast, we found some great riddles we had the kids try to figure out during dinner. Great fun!

Finally, the kids went back to their adventure for the climactic end - the big battle. They all had to work together to defeat the enemy. Afterwards, they headed to Minas Tirith for a scavenger hunt. Each floor, 5 total, had at least 4 artifacts in chests which the birthday guests could find. It was a free for all at Minas Tirith.

This 5-hour party was so cool and I know I'm not doing it any justice in describing it in my non-techie way. Everyone had a blast, it was unique, and memorable, and we still created a world, just in a virtual sort of way. So cool! Great job, Super Hubby!


Wednesday, June 12, 2013

What I Made Wednesday {An Elevenses Birthday Party: Tolkien-Style}: Setting the Scene

Sharing our birthday details is a huge undertaking. If you haven't noticed, I'm giving it to you in teeny tiny bites, like I did Harry Potter. Not because I don't think you can handle all the info all at once, I do. It's that I'm not motivated enough to sit down for looooonnnnggg stretches and write it all out from beginning to end. That's precious summertime daylight I'd be wasting! Seriously, though, it's just way too daunting of a task for me. So, little batches it is. Thanks for your patience:-)


Last week, I shared with you the the all-important making of the invitations. Click here if you missed it. This week, I'll share with you the party props we made and/or used to carry the theme through.

Oh, yes! The theme! It probably needs some explanation. Kiddo L.O.V.E.S. Lord of the Rings. Tolkien is his fave author and he is so into that kind of fantasy-type world. Additionally, if you have a tween boy in the house, you are also probably VERY familiar with an online game called MineCraft. With me so far? What if you combined MineCraft with Lord of the Rings by creating a virtual world? A virtual adventure within MineCraft, where all the party guests work together, not against each other, but as a Fellowship to complete the mission at hand? I know what you're thinking? Yes, it would be superb, but is it possible? Not only is it possible, my friends, it's what we did for this party!!!! (You can send the Parent of the Year Award to our P.O. Box).

I'll explain all the details of the party in next week's post, but I'll show you all the decor we used to set the mood in this post. We decided to combine the two themes into one so, some items will be Tolkien-based, and some items will be MineCraft-themed. It works, trust me!

The Decor
We used our finished basement to set-up all the computers and equipment we needed to make this adventure come alive. To better set the mood, we replaced all of our spotlight bulbs with black lights. The effect was quite amazing and very awesome!

Super Hubby found a great number of MineCraft-themed posters online via Google images and had them printed on a large-format printer. Although the posters were adequate on their own, I mounted them to neon poster cardstock paper to help them really shine! They came out perfectly.


Super Hubby took the main characters of MineCraft and made life-size cutouts of Steve, a Creeper, and a Skeleton (sorry for the lingo non-Minecraft readers). This was a bit of a challenge to put together because the life-size figures measured over 3-feet. How do you print-out something that big? You print sections of it and piece it all together by taping the backside. (I was geometrically challenged on this task but I pulled through.) If you are interested in re-creating this party and want files of these "sectioned" print-outs to do on your own, please contact me and I will send to you. 

The Cake
The pixels read "Happy B-Day Jack", The coconut is only in the middle!
We continued the MineCraft portion of the party with the cake. Easy, peasy folks! I just made a brown sheet cake. Any normal person would have just used a chocolate box cake to achieve the required brown color for "dirt", but my son doesn't like chocolate. I used a white cake mix, bought some brown food coloring, and poured the entire gel right into the cake batter, resulting into successful results. 

Next, I created butter cream frosting and dyed it the same color green as the grass in MineCraft. To get the texture right, take 4 ounces of coconut, place in a plastic bag, and sprinkle a few drops of green food coloring into the coconut. Shake the bag until all the coconut is green. (Powdered food coloring works best, if you can find it. If not, the liquid will be fine. Just let it dry before sprinkling on the cake.) Set the bag aside.

To frost the cake, take another 4 ounces of coconut and add it into the butter cream frosting before spreading it onto the cake. (This is optional as many kids do not like coconut frosting.) To please all, I frosted both ends of the cake without coconut, and only the middle with coconut. YOU WILL NOT FROST THE SIDES. Remember, you are trying to create a MineCraft block of dirt and grass! Sprinkle the top of the cake with the green colored coconut to give it the texture found in the MineCraft game. When you cut the cake, cut in perfect squares so each guest has a "block" of their own.

Finally, I bought Starburst fruit candies and took all the red cherry ones out. I unwrapped each, cut many into fourths for tiny squares, or pixels, and spelled out "Happy B-Day". For my son's name, I used the whole Starburst square because I wanted it to stand out.

Let me guess what you're thinking. Where the heck is the Tolkien part of the party? Sounds to me like it's only MineCraft! Hold your horses, because the entire adventure is ALL Tolkien inspired, from an elves point-of-view. I'll talk more about this next week.

The Sign
Upon arriving at the party, I did make this famous Hobbit sign found at the front gate of Bilbo Baggins's home. I love how this sign turned out. Definitely a keeper. Here's how I made it.

What You'll Need
Thin, but long piece of wood, already stained to your liking
Black paint marker
Awl or very large, sturdy pin
Print-out of the words, enlarged to fit your wood piece (found on Google Images)
Ribbon for hanging the sign

What You'll Do
Super Hubby found this perfect piece of wood that was already stained and already had holes for the hanging ribbon already in place. What luck?!?! Unfortunately, it was one of those types of woods that was varnished to death. If I traced over the printout onto the wood, I couldn't make any impression into the wood no matter how hard I pressed down. I had to come up with a new plan for this to work (since I'm no artist).

To remedy this inconvenience, I taped my paper across the piece of wood and took a very sharp but strong pin. I followed the outline of the letter by poking through the paper and into the wood. It left a small hole that allowed me to just connect the dots once I removed the paper. That's how I was able to transfer the lettering onto the wood! Then it was easy. I just took my black paint pen and filled in the outline. A black Sharpie permanent marker works just as well.

What You'll Need to Know to Finish
Our piece of wood already had the holes in the corners for hanging. If yours doesn't, take a small drill bit and make your holes. Then, take a ribbon, pull it through the holes, and you're ready to hang your sign, just like Bilbo Baggins did. I wish we had a gate.

The Party Favors
One of Kiddo's birthday gifts: The Ring!!!
The take homes were simple this time around. Luckily, I was at Kohl's before the party and found MineCraft t-shirts. They were already on sale for $8 a piece, and, I happened to have a 30% off coupon. Woo-hoo, meant to be! I purchased 8, one for each party guest. 

Then, at the Dollar Tree, I found these glow-in-the-dark mini swords (see first pic). Those were just so perfect for our elvish adventurers. And, finally, the guests had some really cool candies to choose from like marshmallow ropes, RING Pops, Peach Gummy RINGS, and, of course, Swedish Fish (Gollum's favorite). Are you getting the "ring" theme?

Check back for the party details on next week's What I Made Wednesday!


Wednesday, June 5, 2013

What I Made Wednesday {An Elevenses Birthday: Tolkien-Style} THE INVITATION

I'm a firm believer in the birthday invitation. It introduces the theme to your guests, it sets the scene, and it evokes excitement and mystery. The invitation is the all-important, initial first step to any party planning so you've got to get it right (no pressure).

Like last year's decade celebration with a Harry Potter theme, this year's party break down will be issued in several installments because this post would read like a book otherwise. It won't have as many "chapters" as the Harry Potter theme (last year's party was insanely awesome), but it will be incredibly interesting to follow nonetheless, if you choose to come along on this little journey to "there and back again".


There are so many various races in Tolkien's classic, The Lord of the Rings, like the elves, the hobbits, the dwarves, etc. We decided to make all our guests elves and, in so doing, relating the invitation to an elvish character.

The Invitations
"Lembas. Elvish waybread. One small bite is enough to fill the stomach of a grown man."
Legolas Greenleaf on Lembas.
There are several elements to this party invitation including Lembas bread, the Mallorn leaf, writing the guest's name in Elvish, and creating the scroll with all pertinent party information. There's a lot to this invitation but we'll take it nice and slow. Ready?

Lembas Bread
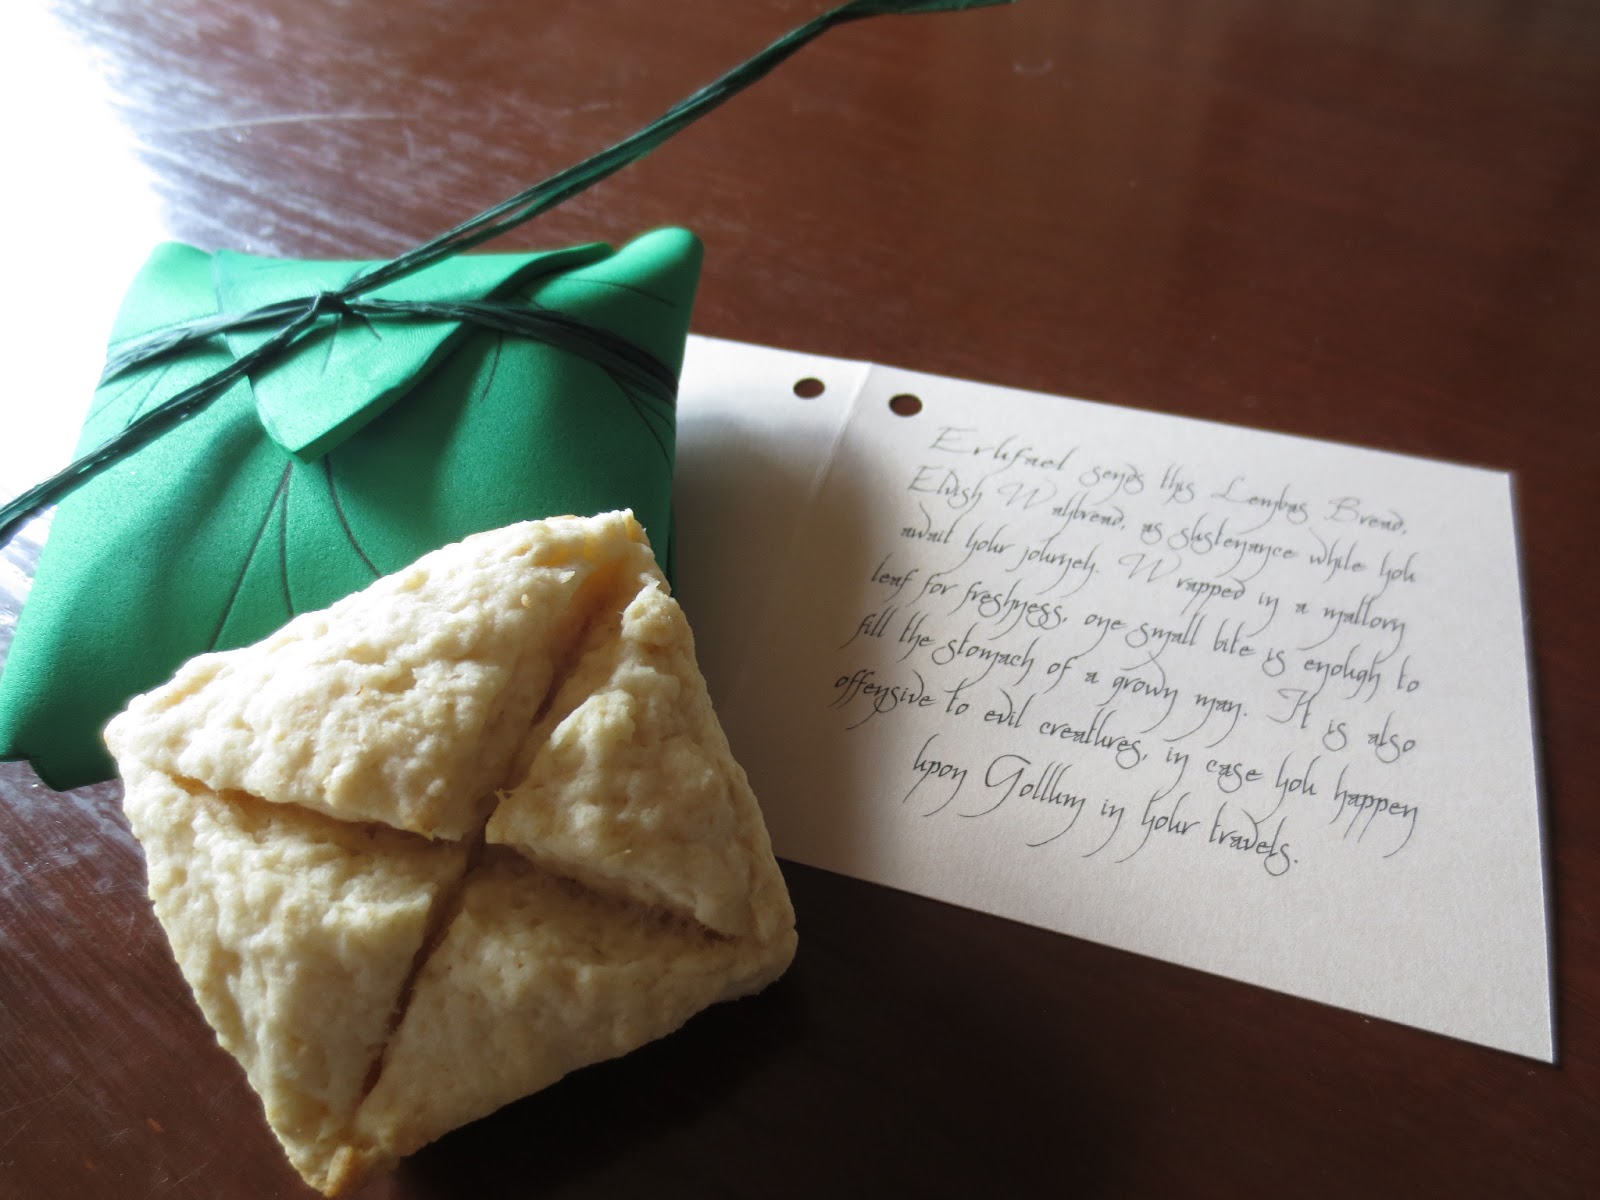
The idea behind the Lembas bread is to send it to each "elf", wrapped in a Mallorn leaf, with an invitation to an adventure, The Great Journey. How do you make a bread depicted in literature that no one alive has actually made, smelled, or tasted? You rely on the author's descriptions and try your hand at doing the best you can with it. But, I also had a little help from this website, to which I should give proper credit.

I tried two different recipes: the one found at the website and my own scone recipe. I'll admit, the scone recipe matches more to Tolkien's description of Lembas bread being dry, brittle, and a bit crumbly. But, the Lembas bread recipe I found at the website was soooo much tastier. I opted for deliciousness over authenticity since the bread was going to be consumed by kids we wanted to come to the party. (You can't excite with crumbly bread, no matter how true to the story.)


Follow the Lembas Bread recipe at this website and you're good to go! (The lemon extract makes ALL the difference so use it.)

Mallorn Leaf and Note

Once the Lembas bread is made, it will be delivered, wrapped in a Mallorn Leaf and tied with raffia or twine. During this project I learned something new that has changed my crafting world forever! You know that foam sheet you can get at any craft store on the planet? Well, if you apply a little heat to it, it's like putty in your hands! You can shape it and bend it any which way you like without melting it and when it cools, it stays the way you shaped it. Don't believe me? Check out my Mallorn Leaf instructions...

What You'll Need
Printout of leaf template, found here 
Green foam sheet (I purchased the large one so I could get 2 leaves out of it)
Black ballpoint pen
X-acto knife or scissors
Heat source (like an electric stove)
Raffia or twine to tie the leaf together with the invitation
Lembas bread


What You'll Do
Cut out foam leaf using template as your guide.
I made 7 invites, plus one to keep for nostalgic purposes, so I purchased 4 green foam sheets to get 2 leaves out of one sheet (so thrifty). Once you get the leaf template printed, cut out the shape and trace that shape onto your foam sheet. Using an X-acto knife for ease, or scissors if you don't have the knife, cut around the outline of the leaf.

Using a black, ballpoint pen add the veins of the leaf as indicated on the template.

Draw the veins using a black ballpoint pen.
OK, here's the fun part. That leaf is flatter than a pancake right now. I really want the leaf to hold the Lembas bread securely so I'm going to apply heat to where the folds should be. I used the burner on my electric stove. BE CAREFUL! It doesn't take a lot of heat to begin to see the foam become malleable to fold. Once it begins to lose its stiffness, take it off the heat and fold it to how you would like it to bend. Allow the couple of seconds for it to cool and repeat until the folds are precisely where they should be (follow the pictures for clarification).
The pointy part will tuck in once the bread is inside.
What You'll Need to Know to Finish
For sanitary purposes, I wrapped each Lembas bread in wax paper. I opened up the Mallorn leaf, placed the Lembas bread in the center, and folded the leaf around the bread like so (see picture). Be sure to tuck the point of the leaf into itself.

Take a looonng piece of raffia and securely tie the leaf in place, leaving enough slack to attach the rolled up invitation (details follow).

Visit this website to convert each guest's name into Elvish. This site will also show the name in Elvish writing. Kiddo's name translated in Elvish to the name, Erufael. Super Hubby found this wonderful font named, ElvenCommonSpeak, and used it for the note and the invite. I purchased tan-ish card stock with a slight texture for the note cards.

Attached to the Lembas bread was a note that had each guest's name and their Elvish name, as well. When they opened the card, this is what they read:

  Erufael sends this Lembas Bread, Elvish Waybread, as sustenance while you await your journey. Wrapped in a mallorn leaf for freshness, "one small bite is enough to fill the stomach of a grown man." It is also offensive to evil creatures, in case you happen upon Gollum in your travels.


The Invitation
Map of Gondolin on back of invite
The type of paper the invite gets printed on makes a big difference. We used a parchment paper with a grey hue to it and it turned out beautifully. The invitation served several purposes. First, it gave the pertinent information about when, why, who, what, and where. The second purpose was to set-up the adventure that awaits our journeying elves. And, lastly, the invitation contained a map necessary for the journey once they arrived to the party. That's a lot from one little invite. Here's the map on the one side of the invite. They'll need this map of Gondolin to navigate through the adventure.

The other side of the parchment read the actual invitation in that really cool font.
Long ago in the First Age
past the Grey Havens
and far over the Blue Mountains
was once a great city of elves.
Though hidden from the world
its secret was betrayed
and the city fell.

A gateway to the past has been opened.
A traveler from another time has entered the Third Age.
Erufael has summoned you, an elf of strong character
to travel with him back to his homeland.

If you desire adventure, come to the Prancing Pony
at xxxx The Shire
in the village of xxxxx
on Saturday, the Eighteenth of May at Five in the evening
for a Tolkien inspired Minecraft expedition
Celebrating Kiddo's Elevenses birthday

RSVP to Lilly

Bring this map, and beware green, creepy men

HOLD THE BOAT! Did the above invitation mention Minecraft, the hottest internet video game around? Yup! Are we combining a Lord of the Rings theme with Minecraft, somehow? Yup! Tune in next week to know how in the world we were able to make this cool party happen.


Wednesday, May 29, 2013

What I Made Wednesday {Shares on Display: VII}

I know, I know, I promised you the birthday party post today but, with this being the last week of school, I just don't have the time to do it any justice. I'm shooting for next week. But, seeing that it is the last week of school, I wanted to show you the last of the Shares on Display.

This month's theme was "What I want to be when I grow up". The case reads, "5th Graders Are Our Future". Those that signed up got to bring items that represented their future occupations and those students were highlighted in the display. But, I couldn't help but include the entire Class of 2020 in this final display of the year. I distributed index cards and had them write their name and future aspirations on the card. If they didn't know, no pressure, they just wrote their name on the card.

I took all the cards and made them form a huge letter "H" representing the name of our school. This is going to take some trial and error to get all the cards to fit into the letter you are trying to create. Don't give up! If, in your case, you have some cards left over, you can always scatter them around in the background. To help the "H" stand out better, I took a black permanent marker and outlined the letter. Much better and I highly recommend this extra step!

Then, on a Dollar Store run, I found these inspirational wall stickies that I just couldn't pass up. To my surprise, they stuck like glue to the paper background! Awesome!

To pizazz it up a bit, I layered the floor of the case with sparkly streamers for better visual effect.

Well, that's that. An entire year of displays where we involved every 5th grader. I had a blast doing it and it really did spruce up the hallway. If you want to see all the display cases, here's a compiled list of them all. I hope this inspires you to volunteer at your school, take over a case, and be as creative as you can be!


All done! See how sad an empty case can look.


Back to TOP

Boutique Blog Design