Thursday, May 31, 2012

Summer: Where to Begin


Get this free printable here.

The cookies have been baked, the thank you cards have been written and delivered, the teachers are ready to say goodbye. Today is a half-day of school for this last day of the school year and tonight we enjoy student-led conferences (can’t wait). Today the asterisk by my son’s name indicating he is a “new student” will disappear when the new school year begins in the fall. We're closing a chapter on the best school year ever and now, oh now, we have a glorious summer ahead of us, new pages to be written, new memories to be made. It's summer, man, where do we begin?


Wednesday, May 30, 2012

What I Made Wednesday {A Harry Potter Birthday Party: The Props}

Inviting the guests and setting the scene to a Harry Potter birthday party is one thing, making the props to add validity to a magical world and creating a genuine experience is another. Our task was to create take-home props for the kids including their Hogwarts School cloak, their Hogwarts textbook, their very own working quill, and, of course, specially designed, unique, one-of-a-kind, wand in a commemorative gift box. All of these items were handmade by Super Hubby and me, including the birthday boy! It wasn't expensive, it just took a lot of time and sweat equity to pull-off.

We started by buying extra large t-shirts from the dollar store. The store only had maroon even though I was hoping for black. Actually, the maroon color happened to be the same color found on the inside of the school cloak from the movie, so it was acceptable. The maroon shirts were over-sized for the kids and looked really great. No, the length didn't reach the floor, but the look was still effective and having all the kids wear the same thing really looked cool! I printed the Hogwarts seal onto sticker paper and used my wonderful X-acto knife to cut around the seal's outline and stuck it to the shirt with no issues. To make the shirt into a cloak, I simply took scissors and cut the front of the shirt in half, lengthwise, in the middle. That's it! Amazingly easy!!!


In the movie, the students wrote with quills and we wanted to create that same identity with Harry Potter. We found tiny gel pens at a local Office Max store, the perfect size needed to fit into the feather. Regular pens have ink casings too long to fit properly into the end of a feather. I took the feather and cut a slit along the tip-end until it was no longer hollow. I unscrewed the tiny pen and took it apart to get the ink well casing. I then shoved the inkwell casing into the feather as far as it would go. The depth will vary and you'll always have some of the pen sticking out of the feather. To cover this up and help the ink well stay in place, I used electrical tape to wrap it securely in place. The feathers were several colors so I tried to match the tape to the feather's color. So the ink doesn't dry up, I capped the ends with the pen's body until the day of the party. Didn't these turn out fabulous?
The textbooks really acted as a road map to the party's itinerary. It led us through the various classes, students wrote in their books as they created their spells and potions, it helped as an answer book to trivia questions. The textbook was definitely a working prop!

To make (sorry, no step-by-step pics), I bought some "pleather" fabric from the local fabric store using a 40% off coupon so, super cheap! The cover had to be a bit larger than a regular sheet of paper which was used to print the pages of the textbook. I cut the cover, folded, and hot-glued all the edges, inward. For the corners, I cut a slit so the folding was more flat and not a bulging mess.
Your cut pleather doesn't have to be pretty because you're then going to hide the folds with your inside cover using old-looking scrapbook paper. This adds such a nice, old-world effect to the look of the book. BUT BEFORE gluing down the inside cover, cut a piece of ribbon and hot glue that onto the pleather book down the center. This will act as your student's bookmark (clever and classy, I know). Print out your book's pages and nest them into your inside cover's center and staple with a long-arm stapler, 3 times down the center of the main book. To attach to the pleather book cover, hot glue the inside cover scrapbook paper to the inside of the pleather book cover, covering all the folds, etc. I made the mistake and didn't staple the guts of the book until the end so the staples are showing through the pleather, so learn from my mistake, friends.


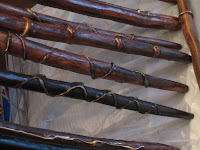
The wands themselves were pretty simple to make. The boxes? A whole 'nother story. First, the wands were made from tree branches my son and I found on a hike. It was great to see the tree branches on the ground and trying to envision a wand in its form. DO NOT cut the branches from the tree as the branch will be too green to take on stain, so the dryer, the better. Take your kitchen potato/carrot peeler and start peeling away the bark down to bare wood. Super Hubby and my dad took the bared branches and sanded them down smooth using a belt-sander. We didn't want any of our wizards to get splinters:-)
Once smooth, apply a wood-stain to each branch and allow to dry. Now for the fun part, take your glue gun and start decorating the wand in whatever pattern that inspires you. Make each one different. When the glue dries, take a gold paint pen and color the glue lines.

Next, take some black paint, water it down a lot, and brush on the wand and wipe down IMMEDIATELY. Work in sections or your effect will only be a black wand! You're only doing this to make it look really old. The results are amazing, each unique, each real wood!

The wand boxes were challenging, but doable once we decided what we wanted to do. First we tried wrapping the box with paper, but painting it was really the easiest method. You'll need cardboard. Look to the big warehouse stores' box area for a great selection. Super Hubby used this link to gather the measurements needed for the box: http://www.youtube.com/watch?v=qYfiIW5HY8Y. Once the boxes were done, we needed to outfit the inside of the box. Again, I apologize for lack of pictures but when you're trying to pull off a party of this magnitude, there's just no time for step by step.


Super Hubby bought a panel of pink foam house insulation and was able to cut into it to create a shaped well to hold each individual wand perfectly snug. We double layered the thin insulation to meet the height of the box. He took each wand and individually outlined the wand's shape, cut out the first insulation layer using an X-acto knife, and glued the two layers together.
 
Afterward, we used velvet material to cover the double layer of pink insulation, leaving enough fabric to lay into the hole where the wand nests. So beautiful, Universal Studios has nothing over these boxes, I'm telling you!

Super Hubby then put his graphic design talents to work and made all the labels, inside and out, for the boxes. The end of each box had a special serial number so Super Hubby knew which wand was whose during the Ollivander's shoppe scenario. The wand needed to choose the right wizard after a few trials. Smart!

Other props included an old trunk where we placed the Quidditch balls. It was also important to glam-up a plastic trophy as the Hogwarts House Cup by simply adding a sticker to the base. And we certainly can't forget Dudley, as the students threw magnetic darts at the target. All our equipment for our Potions and Elixirs class was borrowed from a real lab, real equipment (thank you, friend; you know who you are).


 Finally, this Sorting Hat was purchased from Amazon and was so worth it! Here's why. The hat has a hidden compartment where we put my cell phone, set it to speaker, and the hat "talked" to the kids during the Sorting Ceremony (Super Hubby downstairs on the house phone, on the line with my cell phone - brilliant!). I did starch the hat to create a stiffer "face-look". Sometimes, store-bought is worth the convenience when you're doing a lot of other things yourself.

Catch LOVD's W.I.M. Wednesday next week when we talk about the food!


Need to catch-up to this post?
Series 1: The Invitations
Series 2: Setting the Scene
 

Tuesday, May 29, 2012

Death Hike

OK, this post's title may be a little over the top but "Almost, Kinda, Sorta, Hike That Nearly Ended Our Lives, But Not Really" was just too long to fit on one line. It was about 2:00 in the afternoon on Memorial Day. We finished up the birthday party thank you's ( I can't wait for you to see them), ate a pancake breakfast, and were just hanging out. The day was gorgeous but a bit on the super hot side! Super Hubby suggested we take a hike in the South Chagrin Reservation on a trail we've never been on before, and we've been on most of them. We love to take hikes so we piled into the car and headed out.

Now I know why we've never been on this particular trail. I don't think ANYBODY has ever been on this particular trail. We hiked on this obscure path, admittedly the views were incredible. We were way above the waterfall and river and the path began to narrow. There was evidence of much erosion that had taken place and the path seemed to disappear, at times. Ahh, adventure - I welcome it to a point. We came along a massive mud pile along the "path" and found it necessary to make an upward climb to get around it. As we climbed this steep hill, off the path, I'm holding on to every tree limb to pull me up! I pulled a muscle in my left arm as I held on for dear life. My son, such a trooper, got around the mud pile fine, but when he tried to get back on the path that wasn't really a path, he lost footing and started sliding all the way down the muddy hill. He finally stopped, entire back side black. It's at this point I stopped talking to Super Hubby.

We continued on to find the "path" just ends into a ravine. My son and I started to panic, my husband started to complain why we would have worn sandals on a hike, and after all that, we knew we had to go back the way we came and worse, climb up the hill, too! The only thing worse would have been hearing a banjo play in the distance.


We made our way up the hill, then back down to a ravine with a small stream to wash off our son's back side as best we could. We started to circle around on a path we were familiar with, as I'm still silent about the whole thing. Our son takes my hand and says, "For better or for worse, mom." Ugh, this kid is too wise! He's the one that has a muddy back side, he's the one that, in his own words, had his life span "dwindle to single digits" as he was falling down the hill. Leave it to him to see the adventure and excitement, and love in it all. Our son admits, the hike started good, then went to bad, then really bad, then back to good, but it was exciting when it was really bad, so that made it good.


And this is the point of this post (thank you Super Hubby). Everyday, we live our lives in this safe little bubble we've created for ourselves. For many, venturing beyond those boundaries is a little scary because the unknown is scary. But, if you push the bubble, what awaits you could be the jump start your heart needs to know it's still alive. Getting the heart to beat faster is exhilarating and expanding our life's experiences helps to remind us we are alive and living, and sometimes, we need to pop the bubble to truly know it.


Thanks, Super Hubby, for pushing us down the road less traveled. I'm OK with it as long as we come out alive.


Note: I did not have my camera with me on this last hike. These pictures are from the same area, but during a less harrowing experience.

Monday, May 28, 2012

Gratitude Journal Monday

Memorial Day
Today is Memorial Day in America. No words can ever be enough to express my gratitude for freedoms we enjoy daily.

231. Thank you to those men and women who have made the ultimate sacrifice to protect America's freedom and values.
232. I am grateful my family gets to enjoy the gift of freedom from that sacrifice every day.
233. I am grateful for my grandfather's courage to leave his communist homeland and make a new start in America for a better life for him, his family, and future generations.
234. I am humbled by the gratitude shown by so many thankful, proud Americans.
235. When asked why we celebrate Memorial Day, I am grateful my son was able to answer correctly.


Thank you.

Friday, May 25, 2012

Goodbye Week. Hello Weekend. Lessons Learned: Take 48.

Blossom Time in Chagrin Falls. Circa:2006.
Goodbye last full week of school for 4th grade!
Goodbye end-of-year wrap-ups like Parent Coffee and Volunteer Appreciation Luncheon.
Goodbye spending time and talking with some truly incredible women/moms.
Goodbye putting some of those birthday gift cards to good use at Barnes & Noble.
Goodbye gathering cool tunes and creating a summer playlist to keep us moving.

Hello sampling summertime and making plans for fun in the sun.
Hello sweet, long, welcomed weekend.
Hello BBQ's and get-togethers.
Hello antique shows, mega-sales, and local festivals.
Hello remembering what Memorial Day is really all about.

My lesson learned for the week is more of an admission of guilt coupled with a curiosity of how the rest of the world handles my loathsome nemesis. If you've been a reader for a while, you already know my disdain for ironing. Washing, drying, folding, putting away; I'm all good with those tasks. In fact, I rather enjoy the process. But, those wrinkly clothes that beg to be flattened out by heat and steam end up in a very tall pile just waiting, waiting, waiting for me to get to them. And, I don't. Only in desperation will you find me ironing a shirt when absolutely necessary, going from ironing board to body in one smooth motion. With this practice, the ironing job grows into this huge monstrosity of wrinkled clothes and it just mocks me because it knows it has won; it has gotten the better of me and I'm frozen by the mound of clean, wrinkly clothes.

I need to know, DO YOU IRON? Help me, give me a plan to handle the task better and allow me to gain some control. I'm all ears, my friends! Spill your ironing secrets...

Thursday, May 24, 2012

Going Local: Stoney Hollow Stables

Isn't Shannon so pretty?
I normally make it a rule to not get involved with animals bigger, stronger, or faster than I am. Animals sense my fear. They know the scent of fresh meat and can't wait to prove how wrong the man-over-beast rule really is in their eyes.

So, when a new, sweet friend of mine suggested we go horseback riding, I hesitated to show my pure fear and opted, instead, for enthusiasm. After all, it's good to try new things and all that jazz, right? My friend is an experienced rider, although she'd never take the claim (too modest). The fact is, I've never ridden a horse and she has so I grant her the title of "experienced".

Another friend came, as well, so the three of us loaded up in the Suburban and headed out to Stoney Hollow Stables in Newbury, Ohio. It was a perfect sunny day and anticipating what I was about to do seemed so DALLAS to me, I wish I had brought my cowboy hat so I could have played the part better. Wait! I don't own one.

We got to the stables and met Amy, the owner of Stoney Hollow Stables. She's so great! Her knowledge of horses is amazing and her knack for teaching and instruction is respected and appreciated. Amy really helps newbies feel at ease. You can immediately see the love she has for her horses and, in some way, you want to share that love for the beast, too.
This girl's riding in style today!
My horses name is Shannon and she is so pretty. We started the lesson, very wisely, getting to know one another (Shannon and me, not Amy). Shannon got pampered by all my grooming activity. Brush after brush, comb after comb, Shannon and I bonded. She was so cooperative, lifting each leg in proper position so I could clean the mud out of her feet. I sprayed conditioner in her hair that smelled like a high-end NY salon brand. Shannon stood patiently and just took it all in. I don't think it's wishful thinking, but I think she really liked me!

After grooming and bonding, I tacked Shannon with an English, not Western, saddle. (Look at me with the lingo!) We got to the arena, with a little more confidence in my heart, and I mounted. Like learning to drive, I got used to controlling left and right, stops and starts, turns and turn-arounds.

I was feeling good, then Amy stepped it up a notch. She seems like the type to challenge the student, darn Amy, good teachers are like that. I'll spare the details for my non-horseback riding readers, but I learned how to post (OK, maybe only for 3 seconds, but still)! If you know what posting is you'd be impressed, trust me. No, posting has nothing to do with Facebook in this case. The lesson ended with no broken limbs.
Something is wrong here; Shannon is a much bigger horse in person, seriously!
This experience was so much fun and I'm so glad my fear didn't win out over the chance to try something new and different. If you're in the area, I hope you consider an Intro lesson at Stoney Hollow Stables. And, the soreness might be a myth because it wasn't too bad the next day - it is exercise, you know!


Amy is offering a great deal for a 2-3 hour Intro lesson like the one I experienced for only $20.


If you get a chance, go "Like" them on Facebook to show your support and see all the beautiful horses!


Stoney Hollow Stables
14549 Sperry Road
Newbury, OH 44065
440.543.1008

Just clicking the banner records your vote. It's that easy! Thank you!
  Visit Top Mommy Blogs To Vote For Me!

Wednesday, May 23, 2012

What I Made Wednesday {A Harry Potter Birthday Party: Setting the Scene}

Party ambiance is crucial to a successful party. Besides fun, we had one goal in mind for this birthday party celebration for our son. We wanted to take the kids into the world of Harry Potter. We wanted to surround them and immerse them into the world they have read about and seen on the big screen. Every birthday celebrated at our home has been about giving the kids more than a party, but rather an experience. When our son turned double digits, we knew we wanted this to be the most memorable experience to date. This W.I.M. Wednesday Series began last week with the invitations, click here to get caught up.


Over the years Super Hubby and I have planned A.MAZE.ING birthday parties for our son. We really do make a great team. Super Hubby's strength lies in the imagination and creation part of the party. He comes up with the impossible. I hem and haw arguing his idea is way over the top and impossible to do. "Can't be done" is usually my first response. But, then I take his impossible suggestions and ideas, let it simmer in my brain for awhile, and find a way to make the impossible possible.

Building the framework.
The design was built in an "L" to separate the shops better.
So, when Super Hubby suggested we convert our garage into Diagon Alley and Hogsmeade I responded with "Can't be done" and just let it sit on my brain. I continued to let it brew, actually hoping this particular idea would just fade away, until Super Hubby and our son took down the 2 by 4's from the attic one weekend and started building the framework for the buildings. Shoot, they've started, the train has rolled out of the station and there's nothing to do but get on board and ride it out to the final destination. Secretly I was thinking how awesome it would be if we could pull it off, and awesome just doesn't describe the final result!

Diagon Alley and Hogsmeade
By change of sign, Ollivander's changes to Honeydukes.
By change of sign, Flourish & Blotts changes to Dervish & Banges
The idea was to start the party in Diagon Alley where the kids would pick-up their wands at Ollivander's and their cloaks, textbooks, and quills from Flourish & Blotts. In the middle of the garage we placed a round table where the guests could lounge at The Leaky Cauldron enjoying Pumpkin Juice and throwing magnetic darts for Pin the Tail on Dudley. These same stores would turn into HoneyDukes and Dervish & Banges by the end of the party while in Hogsmeade. The Leaky Cauldron turns into The Three Broomsticks where all partake in our special Butter Beer recipe (will share in a couple of weeks).

The areas were built as an "L" frame so one shop wouldn't interfere with another and we didn't need a wall in between. The key to making this work is to procure LOTS and LOTS of huge pieces of cardboard. Ask your local appliance house to save as many as they can for you, as they are happy to give it away. We got lucky and had one of my husband's clients give us HUGE pieces of cardboard (toy company that makes large outdoor playsets). This will take awhile to collect so get started early.

Using a sponge, make the "bricks" on one of the cardboard walls. For rocks, we cut up sponges in various shapes and sponged in black, brown, and tan. To make wood siding, I just painted lines in brown and made "v" notches every so often. Afterwards, I took the same brown paint and added some knots to make it look more like wood.

Dry ice in the cauldron - so eerie!
The roof was quite simple but required a lot of paint layering. Using a sponge, I started with the brown paint and stamped rectangular squares using a brick pattern. Then, I took the black paint and stamped over the brown, but in an opposite pattern, never directly on top of the brown.
Shoppe bells on doors.

Super Hubby staple gunned the cardboard to the 2 by 4 frame and used a utility knife to cut out the windows and doors. I painted the doors and added a kick plate from some left over scrapbook paper. Super Hubby attached real handles he found from Lord knows when and even installed a bell on the doors, just like a real shop! How cute is that?

Twinkle lights under the roof overhang added a great effect!
See how the "L" makes for a better design?
Look carefully, the sheet is covering all the Hondeydukes candy! Shhh!
At Ollivander's Wand Shoppe, Super Hubby rigged up a fan and lighting to a surge protector, foot at the switch. With each child who visited the shoppe, he went through the same dialogue as in the movie, "Ah, Mr. SoandSo, it seems like just yesterday your parents were in here buying their first wands." The wand boxes were behind Super Hubby and he'd choose one for the young wizard to try. Sadly, nothing would happen and "Mr. Ollivander" would take the wand, place it back in the box, and look a bit perplexed. Seeking another wand box from the shelf behind him, he wonders if this is the right wand. He asks the young wizard to, again, give it a whirl, this one being the ONE! When the wand selects its wizard, Super Hubby's foot hit the on switch and a fan would blow on the wizard and a beam of light would shine down. We should have taken video!

Signs, Signs, Everywhere Are Signs
There were A.LOT of signs we had to make to bring authenticity to this party. Thank goodness Super Hubby was a graphic designer in a past life. The nice thing about doing a Harry Potter party is all the resources you have available online. We didn't have to create the HoneyDukes sign, it already existed. That was the case for many signs, although Super Hubby had to create a few to avoid a pixelated printout. We used our laser color printer to print out all the color signs. To make signs larger, we either printed on Legal-sized paper, or we enlarged the image and printed different sections, one at a time, and layered the sheets on top of each other, aligning each sheet and merging the areas together.

Every time we printed a sign, we mounted the output to foam core to give the sign some rigidity. I hot-glued eye-hooks to the top of the sign and into the foam, and hung each sign from chain or backed with velcro tape.


For The Leaky Cauldron and The Three Broomsticks, I used an X-acto knife to cut-out the sillouette images and used a silver Sharpie marker for the wording. After this party, I love X-acto knives as much as I love my hot glue gun! Now that's saying a lot!!!!


And, of course, with the buildings doing double-duty, acting as Diagon Alley at the beginning of the party, and Hogsmeade by the end of the party, we didn't want anyone to get confused as to where they were so we made this standing sign, one side with Kings Cross/Diagon Alley, then turn it around for Hogwarts/Hogsmeade! The paint job is our son's handiwork! Click on the picture to get a closer look.


Shopping for their school supplies.


Getting Around Harry Potter Style
Upon arrival, the guests were greeted by Hagrid. The young wizards were to travel to Diagon Alley via Flue Powder; see the fireplace mantel? Hagrid held out a cauldron containing sawdust and party snaps. The kids threw down the powder and thanks to the Party Snaps, loud pops blasted when it hit the ground, and they emerged under the mantel, through the "brick" and into Diagon Alley.

For Platform 9-3/4, I handpainted the sign right onto the foam core and attached the eye hooks at the top, into the foam with hot glue and hung it from gold chain on our porch. Using a tension drapery rod, I hung the brick curtain and cut a slit down the middle so they could emerge in the foyer, welcomed to Hogwarts by Hagrid.
For the brick walls, I bought a twin sheet from a cheapie store and cut the sheet in half length-wise since I needed two brick walls, one for Platform 9-3/4 and for the mantel backdrop. I took a sponge and stamped with red paint the brick pattern. WARNING: the paint will seep through the sheet so make sure you stamp over a drop cloth. When I hung the sheets, I cut a slit down the middle as the opening for the kids to run through.

The Great Hall
We removed most of our living room furniture and brought up a long portable table. I set out my gold chargers and made it really look like the fancy feast in the movie (more on food and props in the coming weeks). We hung battery powered candlesticks from the ceiling with fishing wire and this gave a very cool effect!
The Hogwarts pennant was purchased from Amazon for about $13 but I handmade the other pennants. I printed out each house's crest, cut each out with my wonderful X-acto knife, and glued them on 8.5 x 11 sheets of felt after notching a "v" in each (fold in half lengthwise and cut diagonally). Then I just hot glued each pennant to a dowel along with some string and voila, house pennants complete for about $2!

The Dungeon
This area was in the unfinished side of our basement so it was perfect for the dungeon. This is where the kids painted their basilisks (more on class details later) and did their Potions and Elixirs class. For all the junk on the shelves, I just used cobweb material to help hide the stuff and give it more flair.


Honeydukes
This will be discussed in detail in the Food section of this series, but the candy was already there, covered by a silver sheet. Remember, Ollivander's Wand Shoppe becomes Honeydukes by the end of the party! We collected jars from our neighbors, cleaned them, and labeled each with the Honeydukes logo! We used the same names for candy as in the books and movies!


The Quidditch Field
The Quidditch Field was in our own backyard. We made the boundaries out of bamboo sticks and used sheer fabric to make pennants, gluing each of the house crests and Hogwarts seal. The goals, or pitches, were so easy to make. We took hula hoops and placed them through a T-fitting PVC piping attachment (you'll have to separate the hula hoop to do this). To make it fit securely, we wedged toothpicks into the pipe for a tighter fit. Then, we took the T-fitting and attached it to a PVC straight tube. We notched the end to a point so it would go into the ground easier, and that's it!
 
The Players
I did not spend a dime on my costume as Professor McGonagall. My son was Robin Hood years ago so that's where my green cape came from. I had the black turtleneck, the skirt, and brooch. The hat was borrowed from my dear friend and I did sew in the feather, sorry, didn't mean to lie; I did pay $1 for the feather. The glasses are mine anyway. So, people say I made a good Professor McGonagall, minus the gray hair and wrinkles.

Super Hubby was Professor Dumbledore and his wizard costume was made by my dear mother and father. My mom is quite a talented seamstress, although she'd never admit to it. It's a team effort with my parents sewing, as my mom is in a wheelchair. If you know anything about a sewing machine, you'll know that it takes the foot to trigger the machine to stop and start. My dad was my mom's foot. She'd say go and stop and my dad would activate the foot pedal for my mom. Teamwork, I tell you, teamwork!!! The material was difficult to work with, but they did a great job on the costume. The hat was purchased through Amazon and the beard came from a party shop.
That's a regular-sized fridge!


The winning ticket goes to Hagrid, however!!! He's a long-time friend and he surprised us with his no-holds barred costume. Look at how tall the platform shoes made him. With those shoes, he even walked like Hagrid. Amazing, amazing and we'll never be able to thank him enough for his spirit in this party! Thank you, dear friend!


 That's it for this week. Catch you next week for Part 3!!!

This project featured at the Fine Art Craft Guild!
 

Back to TOP

Boutique Blog Design